
This is the last in the series about writing applications which convert text to speech. We started off the journey by introducing the final product, a Speech Tester JavaFX application.
It is this application that we are going to design and build here.
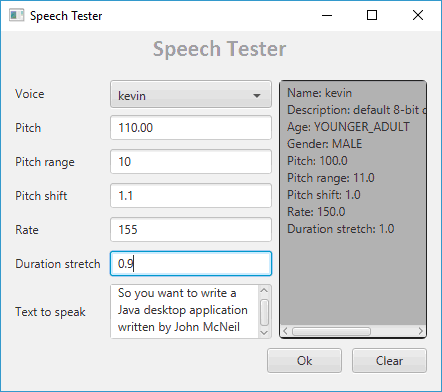 The application allows the user to select an available voice from those that the speech engine has access to. A collection of words, making up a phrase is provided to the application and the application will then convert this text to speech using the selected voice.
User Interface
The application allows for the selected voice sound to be modified by altering various parameters such as the pitch, rate and duration. By altering these setting from the default values the sound can be modified to help find the ideal settings for your needs.
The application has a simple user interface made up of a drop-down list for the available voice selection. There are a series of text fields for each of the configurable items for the voice followed by a text area where the user can type in the words to convert to speech. Over on the right-hand side of the application is another text area with a grey background. This text area is used to display the actual voice settings applied in creating the sound. The ‘Ok’ and ‘Cancel’ buttons play the sound and clear the user interface respectively.
Project setup and application design
Having taken a look at what our application needs to look like we can think about what we need to build our application and how we want to structure the code.
We will build the project using Eclipse IDE, although any IDE will do. Gluon Scene will be used to build and layout the user interface.
We will make use of external libraries as covered in the items earlier in the series but for ease of reference I will list them here:
- FreeTTS speech synthesiser
- MBROLA binary and voices files
As for the structure of our code, this is intended to be a small and simple application and therefore we want to keep it easy. We will have a class as the entry point for the application. This will take care of launching our JavaFX application.
Because we are using Scene Builder, we will have an FXML file containing the XML description of each of the UI items. In partnership with the FXML file, we will have a Java controller file for managing the UI components.
Sometimes when you come to design an application you lack experience in an area. This lack of experience can make it very difficult to know how to build your code. To overcome this limitation, you can build a quick and dirty application to learn how to achieve something. This is exactly what we have done here in the preceding items on Test-to-Speech. We used the earlier exercises to learn how to get the speech synthesiser to work within our project and how to add voices to the speech engine and then finally how to convert the text to sound. With that knowledge, we are better able to understand how to proceed with our application.
We now know that we can get access to the voice manager and this will give us information about the voices available. We also know we will need to get a list of voices that we can display in our drop-down list as well as being able to get a specific voice to use. To help us manage these things we will create a helper class to handle all the voice manager interaction.
We also know we want to display information about the selected voice when used. In order to do this, we will create another class that we can use to get the details of our voice.
That about sums up what we need so let’s take a look at this in more detail.
Creating the project
As I mentioned earlier, we will be using Eclipse in this example, but any IDE will work including handcrafting the project.
Start by creating a JavaFX project. Next, create a new class which I will call ‘SpeechTester’ and place in a package ‘application’.
This class will have the main method entry point for Java as well as extend the ‘javafx.application.Application’ class so that we have the start method entry point for JavaFX.
The main method makes a call to the ‘launch() method passing any arguments passed to the program at run time. The ‘launch()’ method then calls back the ‘start()’ method passing across the primary Stage for the application.
The ‘start()’ method sets the title on the title bar of the application, creates a new scene and adds the scene to the primary stage passed into the method. The cascading style sheet used for the application is loaded into the scene and then the FXML file with the description of the user interface components is loaded into the ‘anchorPane’ that we used to create the scene. The primary stage is then displayed.
The code for the class looks like this:
package application;

import java.io.IOException;
import javafx.application.Application;
import javafx.fxml.FXMLLoader;
import javafx.scene.Scene;
import javafx.scene.layout.AnchorPane;
import javafx.stage.Stage;
import view.SpeechUI_Controller;

/**
 * @author John McNeil
 *
 *
 */
public class SpeechTester extends Application {

	private AnchorPane anchorPane;

	/**
	 * @param args
	 */
	public static void main(String[] args) {
		launch(args);
	}

	@Override
	public void start(Stage primaryStage) throws Exception {
	    primaryStage.setTitle("Speech Tester");
		initRootLayout();

		Scene scene = new Scene(anchorPane);
		primaryStage.setScene(scene);
	    scene.getStylesheets().add(getClass().getResource("application.css").toExternalForm());
		primaryStage.show();
	}

	private void initRootLayout() {
		// Load root layout from fxml file.
        FXMLLoader loader = new FXMLLoader();
        loader.setLocation(SpeechUI_Controller.class.getResource("SpeechUI.fxml"));
        try {
			anchorPane = (AnchorPane)loader.load();
		} catch (IOException e) {
			e.printStackTrace();
		}
	}

}
Just because we have already referenced the file, we will switch our attention to creating the FXML file for the user interface. The file will be part of the ‘view’ package and we will call it ‘SpeechUI’. Using Eclipse, you can create a new file of type FXML. This gives us a stub of an FXML file which we can then use to launch Scene Builder.
<?xml version="1.0" encoding="UTF-8"?>

<?import javafx.scene.layout.AnchorPane?>

<AnchorPane xmlns:fx="http://javafx.com/fxml/1">
	<!-- TODO Add Nodes -->
</AnchorPane>
(example of the FXML stub produced by Eclipse)
Once we have the file created and displayed in the ‘Package Explorer’ view we can right click on the file and open it in Scene Builder.

Once all the fields are added to Scene Builder it will look something like this:
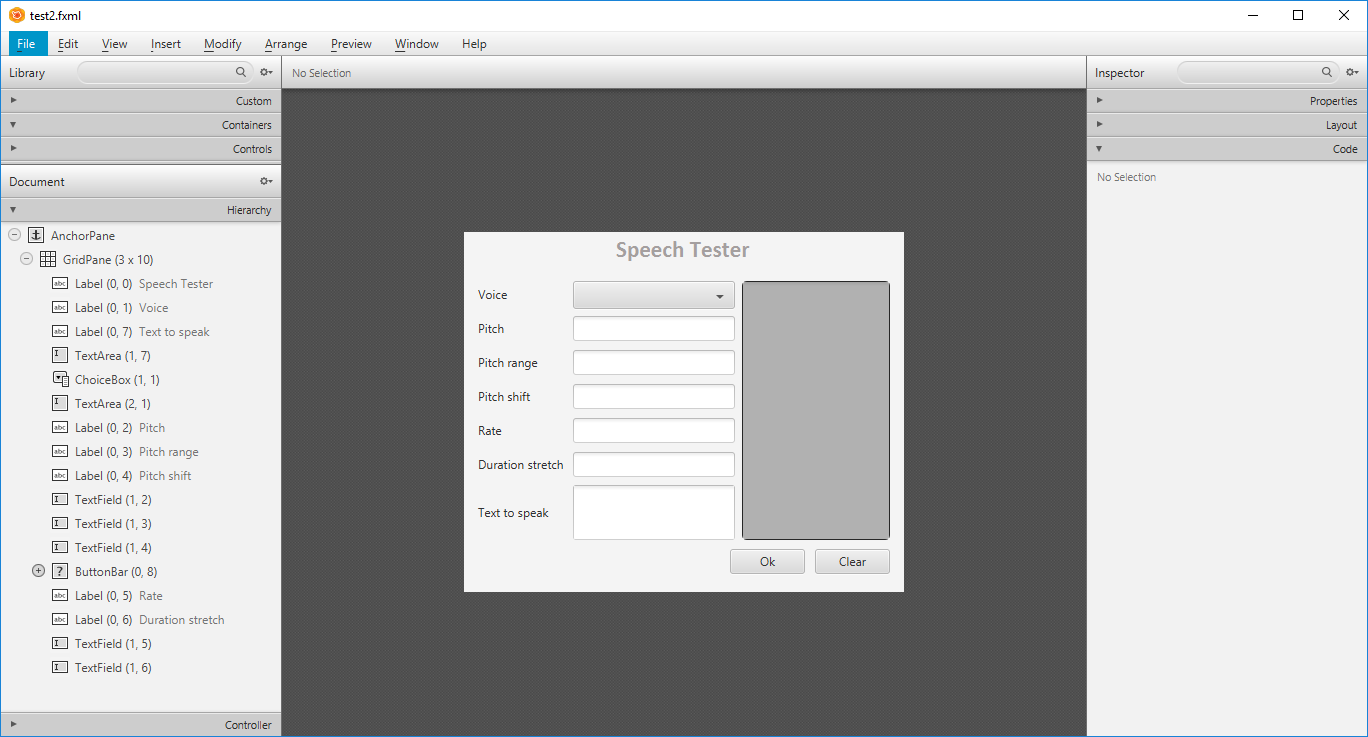
And when Scene Builder saves the changes it updates the FXML file and we have a file that looks like this:
<?xml version="1.0" encoding="UTF-8"?>

<?import javafx.geometry.Insets?>
<?import javafx.scene.control.Button?>
<?import javafx.scene.control.ButtonBar?>
<?import javafx.scene.control.ChoiceBox?>
<?import javafx.scene.control.Label?>
<?import javafx.scene.control.TextArea?>
<?import javafx.scene.control.TextField?>
<?import javafx.scene.layout.AnchorPane?>
<?import javafx.scene.layout.ColumnConstraints?>
<?import javafx.scene.layout.GridPane?>
<?import javafx.scene.layout.RowConstraints?>
<?import javafx.scene.text.Font?>

<AnchorPane maxHeight="-Infinity" maxWidth="-Infinity" minHeight="-Infinity" minWidth="-Infinity" prefHeight="360.0" prefWidth="440.0" xmlns="http://javafx.com/javafx/8.0.111" xmlns:fx="http://javafx.com/fxml/1" fx:controller="view.Speech_Two_Controller">
   <children>
      <GridPane alignment="TOP_CENTER" hgap="7.0" layoutX="14.0" layoutY="14.0" prefHeight="305.0" prefWidth="412.0" vgap="7.0" AnchorPane.bottomAnchor="5.0" AnchorPane.leftAnchor="14.0" AnchorPane.rightAnchor="14.0" AnchorPane.topAnchor="5.0">
        <columnConstraints>
          <ColumnConstraints hgrow="SOMETIMES" maxWidth="152.0" minWidth="10.0" prefWidth="80.0" />
          <ColumnConstraints hgrow="SOMETIMES" maxWidth="227.0" minWidth="10.0" prefWidth="155.0" />
            <ColumnConstraints hgrow="SOMETIMES" maxWidth="156.0" minWidth="10.0" prefWidth="145.0" />
        </columnConstraints>
        <rowConstraints>
          <RowConstraints minHeight="10.0" vgrow="SOMETIMES" />
          <RowConstraints minHeight="10.0" prefHeight="45.0" vgrow="SOMETIMES" />
          <RowConstraints minHeight="10.0" prefHeight="45.0" vgrow="SOMETIMES" />
            <RowConstraints minHeight="10.0" prefHeight="45.0" vgrow="SOMETIMES" />
            <RowConstraints minHeight="10.0" prefHeight="45.0" vgrow="SOMETIMES" />
            <RowConstraints minHeight="10.0" prefHeight="45.0" vgrow="SOMETIMES" />
            <RowConstraints minHeight="10.0" prefHeight="45.0" vgrow="SOMETIMES" />
            <RowConstraints minHeight="10.0" vgrow="SOMETIMES" />
            <RowConstraints maxHeight="60.0" minHeight="10.0" prefHeight="45.0" vgrow="SOMETIMES" />
            <RowConstraints maxHeight="25.0" minHeight="0.0" prefHeight="0.0" vgrow="SOMETIMES" />
        </rowConstraints>
         <children>
            <Label alignment="TOP_CENTER" prefHeight="27.0" prefWidth="410.0" text="Speech Tester" textAlignment="CENTER" textFill="#a4a0a0" textOverrun="CLIP" GridPane.columnSpan="3">
               <font>
                  <Font name="Calibri Bold" size="23.0" />
               </font>
               <padding>
                  <Insets bottom="20.0" top="3.0" />
               </padding>
            </Label>
            <Label text="Voice" GridPane.rowIndex="1">
               <padding>
                  <Insets bottom="3.0" top="3.0" />
               </padding>
               <GridPane.margin>
                  <Insets bottom="5.0" top="5.0" />
               </GridPane.margin>
            </Label>
            <Label text="Text to speak" GridPane.rowIndex="7" />
            <TextArea fx:id="wordsField" prefHeight="73.0" prefWidth="162.0" wrapText="true" GridPane.columnIndex="1" GridPane.rowIndex="7" />
            <ChoiceBox fx:id="voiceField" prefHeight="28.0" prefWidth="162.0" GridPane.columnIndex="1" GridPane.rowIndex="1">
               <padding>
                  <Insets right="3.0" top="3.0" />
               </padding>
               <GridPane.margin>
                  <Insets bottom="10.0" top="10.0" />
               </GridPane.margin>
            </ChoiceBox>
            <TextArea fx:id="voice_details" prefHeight="200.0" prefWidth="200.0" styleClass="background" stylesheets="@../application/application.css" GridPane.columnIndex="2" GridPane.rowIndex="1" GridPane.rowSpan="7" />
            <Label text="Pitch" GridPane.rowIndex="2" />
            <Label text="Pitch range" GridPane.rowIndex="3" />
            <Label text="Pitch shift" GridPane.rowIndex="4" />
            <TextField fx:id="pitch" GridPane.columnIndex="1" GridPane.rowIndex="2" />
            <TextField fx:id="pitchRange" GridPane.columnIndex="1" GridPane.rowIndex="3" />
            <TextField fx:id="pitchShift" GridPane.columnIndex="1" GridPane.rowIndex="4" />
            <ButtonBar prefHeight="40.0" prefWidth="200.0" GridPane.columnSpan="3" GridPane.rowIndex="8">
              <buttons>
                <Button mnemonicParsing="false" onAction="#handleOk" text="Ok" />
                  <Button mnemonicParsing="false" onAction="#handleClear" text="Clear" />
              </buttons>
            </ButtonBar>
            <Label text="Rate" GridPane.rowIndex="5" />
            <Label text="Duration stretch" GridPane.rowIndex="6" />
            <TextField fx:id="rate" GridPane.columnIndex="1" GridPane.rowIndex="5" />
            <TextField fx:id="durationStretch" GridPane.columnIndex="1" GridPane.rowIndex="6" />
         </children>
         <padding>
            <Insets bottom="5.0" top="5.0" />
         </padding>
      </GridPane>
   </children>
</AnchorPane>
Controller class
The one thing to note about the file sample above is that it is the completed file. We still have a few steps left to get our output to match what is displayed above. First off, we need to create a controller file for the user interface. We do this by creating a new Java class in the same package as the FXML file. I tend to call it the same as the FXML file but with ‘_Controller’ added to the end of it so that I know, it is the controller file for the interface file.
So, let’s create a new Java class called ‘SpeechUI_Controller’. In earlier versions of JavaFX, you need to implement an interface to wire it up to the FXML but these days you do not need to. What you do need to do if you want to exchange information between the controller and the interface is to declare the field names on both sides. To set them in the controller class, one the line before declaring the variable declare that the variable is an FXML type by typing ‘@FXML’. Then on the following line declare the variable as you would normally. We will, of course, create types that match our fields we added to the FXML document.
Once we have our fields declared we then need to declare the callback method that the user interface will use to interact with the controller. We do this by once again declaring the method using the ‘@FXML’ instruction followed by the method on the next line.
Within the ‘initialise()’ method we set any default values for fields as well as and dynamic data such as the list of voices available in the drop-down field.
The other connection we need to make is to connect our two buttons methods within the controller that will process any events they trigger. We do this the same way as we did for the ‘initialise()’ and we will call the methods ‘handleOk()’ and ‘handleCancel()’.
The code for the controller looks like this:
package view;

import com.sun.speech.freetts.Voice;

import javafx.fxml.FXML;
import javafx.scene.control.ChoiceBox;
import javafx.scene.control.TextArea;
import javafx.scene.control.TextField;
import speech.VoiceInfo;
import speech.Voices;

public class SpeechUI_Controller {
    @FXML
    private ChoiceBox<String> voiceField;
    @FXML
    private TextArea wordsField;
    @FXML
    private TextField rate;
    @FXML
    private TextField pitch;
    @FXML
    private TextField pitchRange;
    @FXML
    private TextField pitchShift;
    @FXML
    private TextField durationStretch;
    @FXML
    private TextArea voice_details;

 	/**
     * Initialises the controller class. This method is automatically called
     * after the fxml file has been loaded.
     */
    @FXML
    private void initialize() {
    	System.out.println("initialise");

    	voiceField.getItems().removeAll(voiceField.getItems());
    	voiceField.getItems().addAll(Voices.getVoiceNames());
    }


    /**
     * Called when the user clicks ok.
     */
    @FXML
    private void handleOk() {
    	System.out.println("handleOk");

    	//Run the speech using the text from the word field
    	if(voiceField.getValue() != null ) {
    		if(wordsField.getText().length() > 0 ) {
    	    	Voice selectedVoice = Voices.getVoice(voiceField.getValue());

    	    	if(durationStretch.getText().length() > 0 ) {
        			selectedVoice.setDurationStretch(new Float(durationStretch.getText()));
    	    	}
    	    	if(pitch.getText().length() > 0 ) {
        			selectedVoice.setPitch(new Float(pitch.getText()));
    	    	}
    	    	if(pitchRange.getText().length() > 0 ) {
        			selectedVoice.setPitchRange(new Float(pitchRange.getText()));
    	    	}
    	    	if(pitchShift.getText().length() > 0 ) {
        			selectedVoice.setPitchShift(new Float(pitchShift.getText()));
    	    	}
    	    	if(rate.getText().length() > 0) {
        			selectedVoice.setRate(new Float(rate.getText()));
    	    	}

    			selectedVoice.allocate();
    			VoiceInfo.showVoiceData(selectedVoice, voice_details);
    			selectedVoice.speak(wordsField.getText());
    			selectedVoice.deallocate();
    		} else {
    			System.out.println("No text available");
    		}
    	} else {
			System.out.println("No voice selected");

    	}
    }

    /**
     * Called when the user clicks Clear.
     */
    @FXML
    private void handleClear() {
    	// Clear out all the fields
    	//voiceField.setValue("");
    	voiceField.valueProperty().set(null);
		durationStretch.clear();
		pitch.clear();
		pitchRange.clear();
		pitchShift.clear();
		rate.clear();
		wordsField.clear();
		voice_details.clear();
    }
}
Taking a closer look at the initialise method we see that it only has two lines. The first is to clear out all the values that may already be associated with the voice drop-down field. We do this because historically there use to be an issue with this type of field and this makes sure the field reflects the values we want.
The next line re-populates the drop-down list with the voices from the Voice Manager. We do this by getting a handle to the list of items associated with the field and then calling the ‘addAll()’ method to add a list of Strings to the object. We get the list of Strings from another class which we have not created yet but will look at next. A call to ‘getVoiceNames()’ returns a list of names of the voices the Voice Manager is aware of. This way we only offer voices that are supported by the manager.
The ‘handleOk()’ method as the name suggests processes the OK click event. The method checks to see that a selection has been made for the voice. We then check to see that there is some test to convert into sound by checking the words field has a length greater than zero.
Providing those two fields have values we are all set to make some sound. However, before we do, we check to see if any of the other fields available to configure the sound have values. If they do, then these values are set on the currently selected voice.
Once all the configuration settings have been applied, we then allocate the voice. Next, we call the ‘showVoiceData()’ method, this is a method from another new class the VoiceInfo class and as the name suggests this is responsible for providing details about the voice. We use this method to populate the text area field on the right-hand side of the application.
To convert the text to sound we call the ‘speak()’ method of the voice and then the ‘deallocate()’ to free up any resources we may have allocated. That’s the job done.
Voices class
So now we have the controller sorted out we can go back and look at the Voices class which we use to manage the voices within our application. This class is part of the ‘speech’ package and is called ‘Voices’. The class is made up of 4 methods; all of them public.
The first of the methods we deal with here is the ‘getVoiceManager()’ method and this simply calls the FreeTTS VoiceManager class static method ‘getInstance()’. The only real value of this method is that it also sets the mbrola.base property of the application to point at the location of the MBROLA speech engine as installed on the local client.
Next up is the ‘getVoices()’ method which returns an array of voices. This is used to get a list of supported voices that the manager is aware of.
The ‘getVoiceNames()’ method makes use of the ‘getVoices()’ method to get a list of all the voices and from this, it creates a list of names of the voices.
The last method is the ‘getVoice()’ which is passed the name of a voice and returns the voice object that matches the name. The voice object can then be used to convert the text to sound.
The Voices class looks like this:
package speech;

import java.util.ArrayList;
import java.util.List;
import com.sun.speech.freetts.Voice;
import com.sun.speech.freetts.VoiceManager;

public class Voices {
	public static VoiceManager getVoiceManager() {
		System.setProperty("mbrola.base", "C:\\mbr301d");
		// VoiceManager uses the singleton approach to creating and
		// providing an instance
		return VoiceManager.getInstance();
	}

	public static Voice[] getVoices() {
		VoiceManager vm;
		vm = getVoiceManager();
		// Get all the voices which the VoiceManager knows about
		return vm.getVoices();
	}

	public static Voice getVoice(String strVoice) {
		VoiceManager vm;
		vm = getVoiceManager();
		return vm.getVoice(strVoice);
	}

	public static List<String> getVoiceNames() {
		Voice[] voices = getVoices();
		ArrayList<String> strVoices = new ArrayList<>();
		for( Voice voice:voices ) {
			strVoices.add(voice.getName());
		}
		return strVoices;
	}
}
VoiceInfo class
Next up we have the VoiceInfo class. This class is part of the ‘speech’ package and has two public methods although only one is used here.
Essentially all this class does is take certain voice information and make it available to a target output. Both methods are called ‘showVoiceData()’. One of the methods accepts a voice object and prints out the details of the voice to the standard out device which in Eclipse is the console. I originally compiled this method to help me see what was going with the voices and hence it is still here but not used.
The other method signature receives a Voice object and a TextArea object and does the same as the other method but this time the target output is the TextArea. This method is used within the application to publish the voice details to the text area on the right-hand side of the user interface.
The code for the class looks like this:
package speech;

import com.sun.speech.freetts.Voice;
import javafx.scene.control.TextArea;

public class VoiceInfo {

	public static void showVoiceData(Voice voice) {
    	System.out.println("showVoiceSettings");

		System.out.println("Name: " + voice.getName());
		System.out.println("age: " + voice.getAge());
		System.out.println("description: " + voice.getDescription());
		System.out.println("domain: " + voice.getDomain());
		System.out.println("duration stretch: " + voice.getDurationStretch());
		System.out.println("gender: " + voice.getGender().toString());
		System.out.println("organisation: " + voice.getOrganization());
		System.out.println("pitch: " + voice.getPitch());
		System.out.println("pitch range: " + voice.getPitchRange());
		System.out.println("pitch shift: " + voice.getPitchShift());
		System.out.println("Audio Player: " + voice.getAudioPlayer());
		System.out.println("Lexicon: " + voice.getLexicon().toString());
		System.out.println("Rate: " + voice.getRate());
		System.out.println("Style: " + voice.getStyle());
		System.out.println("Volume: " + voice.getVolume());
	}

	public static void showVoiceData(Voice voice, TextArea target) {
		target.clear();
		target.appendText("Name: " + voice.getName() + "\n");
		target.appendText("Description: " + voice.getDescription() + "\n");
		target.appendText("Age: " + voice.getAge() + "\n");
		target.appendText("Gender: " + voice.getGender().toString() + "\n");
		target.appendText("Pitch: " + voice.getPitch() + "\n");
		target.appendText("Pitch range: " + voice.getPitchRange() + "\n");
		target.appendText("Pitch shift: " + voice.getPitchShift() + "\n");
		target.appendText("Rate: " + voice.getRate() + "\n");
		target.appendText("Duration stretch: " + voice.getDurationStretch() + "\n");
	}
}
That’s it, all the code for the application. You can download the source code for this from the earlier blog post JavaFX and adding basic speech