
In the last post we saw how you can easily create a JTree using an array of strings. The JTree however did not display the values in a hierarchy but displayed all the values at the same level. So in this post we will build our Java Desktop Application using JTree with a hierarchy.
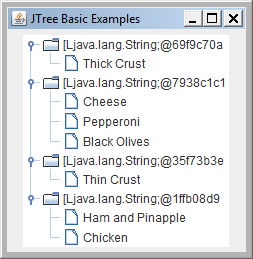
Now if we follow on from our previous example of building a JTree from an array we could go about it like this:
final String[][] toppings2 = { {"Thick Crust"}, {"Cheese", "Pepperoni", "Black Olives"}, {"Thin Crust"}, {"Ham and Pinapple","Chicken" } } ;

public class JTreePanelTwo {
	private JPanel jpanel = new JPanel();
	private JTree treeOne;
	private String [][]options;

	public JTreePanelTwo(String vals[][]) {
		super();
		options = vals;
		treeOne = new JTree(options);
		jpanel.add(treeOne);
	}

	public JPanel getJpanel() {
		return jpanel;
	}
}
But the result of this is not quite what we are looking for:
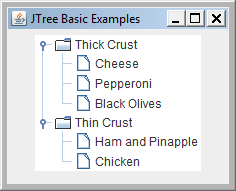
If we want to build a JTree with a hierarchy then we need to use Tree Nodes. There are a two TreeNode interfaces provided in the swing package, TreeNode and MutableTreeNode as well as a concrete class DefaultMutableNode.
So, we could build our own implementation of TreeNode and implement one or both of the interfaces or we can, given our simple needs, build the hierarchy using the DefaultMutableTreeNode like this:
public class JTreePanelThree {
    private JPanel jpanel = new JPanel();
    private JTree treeOne;
    final String[][] toppings3 = { {"Thick Crust"}, {"Cheese", "Pepperoni", "Black Olives"}, {"Thin Crust"}, {"Ham and Pinapple","Chicken" } } ;

    public JTreePanelThree() {
        super();

        DefaultMutableTreeNode root = new DefaultMutableTreeNode("root");

        DefaultMutableTreeNode sub1 = new DefaultMutableTreeNode(new DefaultMutableTreeNode(toppings3[0][0]));
        DefaultMutableTreeNode sub2 = new DefaultMutableTreeNode(new DefaultMutableTreeNode(toppings3[2][0]));

        sub1.add( new DefaultMutableTreeNode(toppings3[1][0]) );
        sub1.add( new DefaultMutableTreeNode(toppings3[1][1]) );
        sub1.add( new DefaultMutableTreeNode(toppings3[1][2]) );

        sub2.add( new DefaultMutableTreeNode(toppings3[3][0]) );
        sub2.add( new DefaultMutableTreeNode(toppings3[3][1]) );

        root.add(sub1);
        root.add(sub2);

        treeOne = new JTree( root );
        treeOne.setRootVisible(false);
        treeOne.setShowsRootHandles(true);
        jpanel.add(treeOne);
    }

    public JPanel getJpanel() {
        return jpanel;
    }
}
Here we create a DefaultMutableTreeNode for each of the parent nodes. We can then add children and nodes to a parent.
Another difference is the constructor we now use means the JTree is created using a node set as the root and will display this by default.
In the previous example the constructor used resulted in hiding the root node by default, in this case we explicitly created a root node and therefore have to hide it using setRootVisible(false).
The use of the constructor means that we also do not get handles to expand and collapse the nodes with children, to get that to display we call the setShowsRootHandles(true).
The result we get is:
Now all this is fine but, usually when we use a JTree it is because we want to be able to select an item, one or more and display additional information based on the selection. In the next posting we will take a look how we can accomplish this.