
Making a Windows MSI from a Java 11 and JavaFX 11 Desktop application
With the advent of Java 9 and the introduction of 6 monthly release cycles, the Java Desktop landscape has changed considerably. If you find yourself looking to build Desktop applications using JavaFX and present them as self-contained applications, then take note.
To avoid confusion this article is a walk-through, taking a simple JavaFX application and turning it into a Windows MSI installer that includes the Java application and the Java Runtime Environment.
This walkthrough makes use of the following software:
- OpenJDK 11
- OpenJFX 11
- JPackager
- Wix Toolset 3.11
Before we start, I think I should draw attention to a few things:
- The use of Java 11 was selected as this is the first Long Term Support (LTS) release of Java since the unbundling of JavaFX and the move to a modular system.
- From Java 9 there is no longer a Java Runtime Environment (JRE) provided with the release, you need to build your own JRE with the features required for your application. A tool called JLink is provided to enable this.
- The JPackager tool is a very confusing area so ensure you get the tool from the link provided. In Java 8 when JavaFX was bundled with JDK there was a JavaFX tool called JavaPackager. This was dropped in Java 9 when JavaFX was unbundled from the JDK. When the next Long Term Support (LTS) version of Java was released, Java 11, there was no native support for packaging up Java and JavaFX desktop applications. Support was not provided until Java 14 with an early release of what was now called JPackage (note no ‘r’ at the end). JPackage is due for formal release in LTS Java 17. Johan Vos of Gluon HQ realised there was a need to provide something for the LTS Java 11 version and did a backport of the Java 14 product, which at the time was known as JPackager and hence the Java 11 product is called JPackager with the ‘r’ at the end. The Java 11 JPackager can be found here: https://mail.openjdk.java.net/pipermail/openjfx-dev/2018-September/022500.html.
- JPackager seems to only support building MSI packages for the Windows platform and hence the use of Wix Toolset.
I am assuming that you have a JavaFX application which will run on Java 11 in your development environment. The one I used I copied from https://github.com/openjfx/samples/tree/master/HelloFX/CLI and added to my development environment.
Once the code runs you should be good to go. Everything else in this article is executed from the command line using basic Java programs.
I’m a great believer in taking small steps when trying to get something to work or learn something. Far too often people reach for an automated tool which does it all for you with just the push of a single button. The issue with this approach is when it does not do what you want, what then?
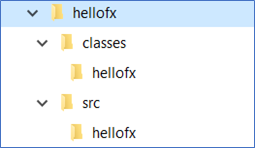
Here we will compile our code, even though our development environment has already done this for us. In fact, to start with we are going to compile our Java application into class files and then run these class files. Once we get that to work we will move to build a JAR file and then package up the JAR file into an MSI.
Run a Non-Modular Application from Class files
Whilst Java 9 introduced modular building of applications there is still the option to build a non-modular JRE, a traditional JRE if you like. This is what we are doing here. Whilst the application was developed with a module-info file i.e. a modular application however because we are compiling the code using the Java command line we can do things differently and to be honest, this is the way I am able to get things working so that’s the way I do it.
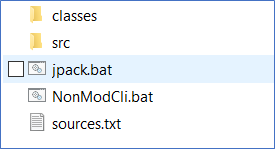
All of the following instructions are issued from the Command prompt in windows starting in the root directory of the project.
- Set a Path variable to point to the lib subdirectory for installation of OpenJFX.
set PATH_TO_FX=”installation\path\lib”
- Change location to the root of your project.
cd “c:\location\of\project”
- Build a file listing the path and names all the java source code files
dir /s /b src\*.java > sources.txt
Note: If the path has spaces, then you need to edit the file and enclose the file path/filename in double quotes e.g. “c:\some space\file.java”
- Now call the Java compiler, set the module path to point to the FX lib subdirectory, explicitly add any java modules required, specify the output location to write the class files and then pass the sources text file
javac --module-path %PATH_TO_FX% --add-modules=javafx.controls -d classes @sources.txt
- Run the code using the Java command, set the module path to point to the FX lib subdirectory, explicitly add any java modules required, set the directory where the class files can be found, and then pass the full package and file name for the class file to launch the application
java --module-path %PATH_TO_FX% --add-modules=javafx.controls -cp classes hellofx.HelloFX
Run a Non-Modular Application from Jar file
Now we know we can build a JavaFX application from the command line its time to create our JAR file and package it up.
There is one problem with making a fat JAR file that includes the JRE. With the unbundling of JavaFX from the JDK, it means the JavaFX libraries are no longer a part of Java.
Previously when we wrote JavaFX applications the main class would extend the javax.application.Application class. When launching Java the JVM would look for the main class and because it extends another class it would then look for that class. Now, as I understand it, the JVM can only access classes that are part of Java when launching and as the Application class is no longer a part of Java it cannot be found.
The solution is to create a new main class that has a main method, and in that main method call the JavaFX static main method. Make sure to place it in a package and reference it using the package name.
public class Launcher {
   public static void main(String[] args) {
      HelloFX.main(args);
   }
}
Once again all of these instructions are issued from the Command prompt in windows starting at the root directory of the project.
- Set a Path variable to point to the lib subdirectory for installation of OpenJFX.
set PATH_TO_FX=”installation\path\lib”
- Change location to the root of your project.
cd “c:\location\of\project”
- Build a file listing the path and names all the java source code files
dir /s /b src\*.java > sources.txt
Note: If the path has spaces then you need to edit the file and enclose the file path/filename in double quotes e.g. “c:\some space\file.java”
- Now call the Java compiler, set the module path to point to the FX lib subdirectory, explicitly add any java modules required, specify the output location to write the class files and then pass the sources text file
javac --module-path %PATH_TO_FX% --add-modules=javafx.controls,javafx.fxml,javafx.graphics -d jarclasses @sources.txt
- If your project has any resource files, files that are none source code, then we need to move these across to the jarclasses sub-directory. To do this we create a text file with “.java” in it which is used in the next instruction. The next instruction copies all files from the src folder, including any subfolders, to the jarclasses folder but excludes any “.java” file extension.
echo .java > excl.txt
xcopy src\*.* jarclasses /S /I /E /Y /EXCLUDE:excl.txt
- Now go to the sub-directory ‘jarclasses’
cd jarclasses
- Extract files from the JavaFX jars and place the extracted files into the current directory
jar xf %PATH_TO_FX%\javafx.base.jar
jar xf %PATH_TO_FX%\javafx.graphics.jar
jar xf %PATH_TO_FX%\javafx.controls.jar
jar xf %PATH_TO_FX%\javafx.fxml.jar
- Go back up one directory, back to the project root
cd..
- Copy the Windows dynamic link library files required to run the application from the JavaFX location to the ‘jarclasses’ location
copy %PATH_TO_FX%\..\bin\prism*.dll jarclasses
copy %PATH_TO_FX%\..\bin\javafx*.dll jarclasses
copy %PATH_TO_FX%\..\bin\glass.dll jarclasses
copy %PATH_TO_FX%\..\bin\decora_sse.dll jarclasses
- Remove the manifest file and the module-info class file from the ‘jarclasses’ sub-directory which were added when the files were extracted from the jars
del jarclasses\META-INF\MANIFEST.MF
del jarclasses\module-info.class
- Make a sub-directory called libs
mkdir libs
- Package up the files in the ‘jarclasses’ sub-directory into a Jar
jar --create --file=libs/hellofx.jar --main-class=hellofx.Launcher -C jarclasses .
- Run the application using the Java command and passing in the Jar file
java -jar libs\hellofx.jar
Package JAR file into a Windows MSI
Now the code is packaged into a Runnable Jar file the next step is to wrap the Jar file into an executable Windows application and present it as an MSI installer.
- Run JPackager and create installers for all supported platforms, in this case, it will only be for Windows. Send the output to the build sub-directory which will be created if it doesn’t exist. The ‘libs’ sub-directory will be used for the input, this is where we placed the Jar file. The name of the installer will be ‘testapp’ and the Jar file to launch will be ‘hellofx.jar’ which should have a manifest file listing the class file to launch. Finally, the build will include the module files from the JDK, these build the JRE.
jpackager create-installer --output build --input libs --name testapp --main-jar hellofx.jar --module-path "%JAVA_HOME%\jmods"
The MSI can now be distributed to Windows machines, the user can run the MSI which will install the application onto the computer and add the program to the Windows Start options.
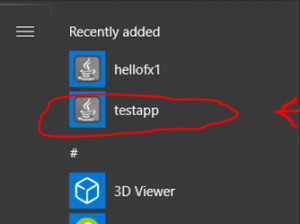
That is it we now have an MSI file to distribute to our client base and they can double click to install it onto their systems.
Hello, thanks for this post. It has helped me get some insights and understand some differences between packaging JavaFX 11 and Java 11 from my project. However, I still don’t know how to do it with my project.
Mine is built in Eclipse, using Maven. It is using Java 8 JRE and JavaFX 22. I tried changing my system Java installation to Java 8, but Eclipse refused to run requiring Java 17 upwards. So, while I am still using Java 8, the system java path has Java 22. DI further managed to build a jar file with Eclipse, but when I try running it, it tells me fx runtime components are missing. I cannot package to an MSI without the jar file. What do you suggest I do in my case? My project is long overdue!
Thanks in advance.
Hi Samuel,
I missed your comment so apologies for the late reply.
Whatever system you are using , first try to get a smiple Java only hello world application built using it.
Then build a simple JavaFX application so you know how to do the basics.
If you are using Maven then as I understand things you need a plugin for JavaFX defined in your POM file. The POM will allow you to specify the Java version to use.
If you have built your code using Java 8 you should be OK compiling with Java 17 or 22.
Packaging up applications is another level of complexity on top of writing the Java code.