
Imagine we have a small JavaFX application. We are building this application in Eclipse, although this should not make any material difference, you could build it in using any IDE or simple command line tools.
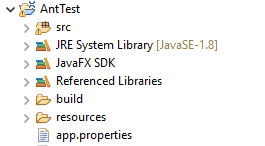
This application has some java files under the “src” folder. There is also a “resources” folder which contains some none java files which the application will reference. Added to this we are using some 3rd party JAR libraries. Finally, we have a text-based properties file for our application.
Our project structure looks like this:
We are going to use ANT to produce a Windows executable application. The steps we need to take to do this are: –
- Compile our java code
- Package up the code into a runnable JAR
- Use Inno Setup 5 to create a self-extracting executable application
Using Eclipse you can create a JavaFX project and with this you get “build.fxbuild” file. This file allows you to create an ANT build XML file. The build file will compile and package up your code including any project libraries. To get the resource files you will need to modify the generated ANT script.
So, to start off with we have this:
<?xml version="1.0" encoding="UTF-8"?>
	<project name="AntTest" default="do-deploy" basedir="."  xmlns:fx="javafx:com.sun.javafx.tools.ant">
	<target name="init-fx-tasks">
		<path id="fxant">
			<filelist>
				<file name="${java.home}\..\lib\ant-javafx.jar"/>
				<file name="${java.home}\lib\jfxrt.jar"/>
			</filelist>
		</path>

		<taskdef resource="com/sun/javafx/tools/ant/antlib.xml"
			uri="javafx:com.sun.javafx.tools.ant"
			classpathref="fxant"/>
	</target>
	<target name="setup-staging-area">
		<delete dir="externalLibs" />
		<delete dir="project" />
		<delete dir="projectRefs" />

		<mkdir dir="externalLibs" />

		<copy todir="externalLibs">
			<fileset dir="C:\Users\jmcneil\Documents\Java\Spell\Libraries">
				<filename name="cmutimelex.jar"/>
			</fileset>
		</copy>
		<copy todir="externalLibs">
			<fileset dir="C:\Users\jmcneil\Documents\Java\Log4J2">
				<filename name="log4j-api-2.10.0.jar"/>
			</fileset>
		</copy>
		<copy todir="externalLibs">
			<fileset dir="C:\Users\jmcneil\Documents\Java\Spell\Libraries">
				<filename name="freetts-jsapi10.jar"/>
			</fileset>
		</copy>
		<copy todir="externalLibs">
			<fileset dir="C:\Users\jmcneil\Documents\Java\Log4J2">
				<filename name="log4j-core-2.10.0.jar"/>
			</fileset>
		</copy>
		<copy todir="externalLibs">
			<fileset dir="C:\Users\jmcneil\Documents\Java\Spell\Libraries">
				<filename name="freetts.jar"/>
			</fileset>
		</copy>
		<copy todir="externalLibs">
			<fileset dir="C:\Users\jmcneil\Documents\Java\Spell\Libraries">
				<filename name="cmudict04.jar"/>
			</fileset>
		</copy>
		<copy todir="externalLibs">
			<fileset dir="C:\Users\jmcneil\Documents\Java\Spell\Libraries">
				<filename name="mbrola.jar"/>
			</fileset>
		</copy>
		<copy todir="externalLibs">
			<fileset dir="C:\Users\jmcneil\Documents\Java\Spell\Libraries">
				<filename name="cmulex.jar"/>
			</fileset>
		</copy>
		<copy todir="externalLibs">
			<fileset dir="C:\Users\jmcneil\Documents\Java\Spell\Libraries">
				<filename name="cmu_time_awb.jar"/>
			</fileset>
		</copy>
		<copy todir="externalLibs">
			<fileset dir="C:\Users\jmcneil\Documents\Java\Spell\Libraries">
				<filename name="en_us.jar"/>
			</fileset>
		</copy>
		<copy todir="externalLibs">
			<fileset dir="C:\Users\jmcneil\Documents\Java\Spell\Libraries">
				<filename name="cmu_us_kal.jar"/>
			</fileset>
		</copy>

		<mkdir dir="project" />
		<copy todir="project">
			<fileset dir="C:\Users\jmcneil\Documents\workspace\AntTest">
				<include name="src/**" />
			</fileset>
		</copy>

		<mkdir dir="projectRefs" />
	</target>
	<target name='do-compile'>
		<delete dir="build" />
		<mkdir dir="build/src" />
		<mkdir dir="build/libs" />
		<mkdir dir="build/classes" />

		<!-- Copy project-libs references -->
		<copy todir="build/libs">
			<fileset dir="externalLibs">
				<include name="log4j-api-2.10.0.jar"/>
				<include name="cmu_time_awb.jar"/>
				<include name="cmutimelex.jar"/>
				<include name="en_us.jar"/>
				<include name="freetts-jsapi10.jar"/>
				<include name="log4j-core-2.10.0.jar"/>
				<include name="cmu_us_kal.jar"/>
				<include name="cmudict04.jar"/>
				<include name="cmulex.jar"/>
				<include name="freetts.jar"/>
				<include name="mbrola.jar"/>
			</fileset>
		</copy>

		<!-- Copy project references -->

		<!-- Copy project sources itself -->
		<copy todir="build/src">
			<fileset dir="project/src">
				<include name="**/*"/>
			</fileset>
		</copy>

		<javac includeantruntime="false" source="1.8" target="1.8" srcdir="build/src" destdir="build/classes" encoding="Cp1252">
			<classpath>
				<fileset dir="build/libs">
					<include name="*"/>
				</fileset>
			</classpath>
		</javac>

		<!-- Copy over none Java-Files -->
		<copy todir="build/classes">
		<fileset dir="project/src">
			<exclude name="**/*.java"/>
		</fileset>
		</copy>


	</target>
	<target name="do-deploy" depends="setup-staging-area, do-compile, init-fx-tasks">
		<delete file="dist"/>
		<delete file="deploy" />

		<mkdir dir="dist" />
		<mkdir dir="dist/libs" />

		<copy todir="dist/libs">
			<fileset dir="externalLibs">
				<include name="*" />
			</fileset>
		</copy>


		<fx:resources id="appRes">
			<fx:fileset dir="dist" includes="AntTest.jar"/>
			<fx:fileset dir="dist" includes="libs/*"/>
		</fx:resources>

		<fx:application id="fxApplication"
			name="AntTest"
			mainClass="application.AntTest"
			toolkit="fx"
		/>

		<mkdir dir="build/classes/META-INF" />


		<fx:jar destfile="dist/AntTest.jar">
			<fx:application refid="fxApplication"/>
			<fileset dir="build/classes">
			</fileset>
			<fx:resources refid="appRes"/>

			<manifest>
				<attribute name="Implementation-Vendor" value="softwarepulse.co.uk"/>
				<attribute name="Implementation-Title" value="AntTest"/>
				<attribute name="Implementation-Version" value="2.0.0"/>
				<attribute name="JavaFX-Feature-Proxy" value="None"/>
			</manifest>
		</fx:jar>


		<mkdir dir="deploy" />
		<!-- Need to use ${basedir} because somehow the ant task is calculating the directory differently -->
		<fx:deploy
			embedJNLP="false"
			extension="false"
			includeDT="false"
			offlineAllowed="true"
			outdir="${basedir}/deploy"
			outfile="AntTest" nativeBundles="exe"
			updatemode="background" >

			<fx:platform basedir="${java.home}"/>
			<fx:info title="AntTest" vendor="softwarepulse.co.uk"/>

			<fx:application refId="fxApplication"/>
			<fx:resources refid="appRes"/>
		</fx:deploy>


	</target>
</project>
The first line is simply an XML comment line. The next line defines the ANT project. The ANT build project is given a name, in this case “AntTest”. The build file is made up of a collection of what is referred to as targets, on this first line we also specify the target to process if we do not specify a value. Then there is setting the base directory to use for the project, in this case we are using the location of this actual build file. Lastly, we specify the namespace for the fx library. We need to do this as some of the tags are used elsewhere and we will get naming conflicts if we do not define a scope for the fx elements.
The next line defines our first target which we call “init-fx-tasks” and as the name suggests we will put in place some items to allow us to use the fx tools to build the project. Essentially this means we specify where the ANT libraries are located and give them a single name to reference them.
After the initialise fx target comes the “setup-staging-area” target. Here we collect together the files we will need to build the application. First to clean up any previous build, we ensure the folders we will go on to use are deleted and then we can create new empty folders. All the libraries used in the project are copied to the “externalLibs” folder. All the java source code under the Eclipse “src” folder and associated files in these packages are copied to the “project” folder. Lastly for this target, all the files which are used by the application are copied to the “projectRefs” folder.
The “do-compile” target is all about compiling the java code. For this a “build” folder is created and within this folder “src”, “libs” and “classes” folders. The application libraries are then copied from the “externalLibs” folder created in the earlier step to the “libs” folder under the build folder.
If the application has any file references that the application requires these are moved.
The java source files from the “project” folder created in the earlier step are then copied to the “src” folder under the “build” folder.
With all the code in place a call is then made to the Java Complier passing it the source code the destination path and a reference to the libraries.
After the compiler has finished the none java files contained within the source code are copied across to the “build/classes” folder.
At the end of this target stage all the java code is now compiled, and we can start to look at packaging up the application.
The next target is the “do-deploy”. This can be broken down into two parts; the first part is to wrap the compiled code up into an executable jar file and the other part is to wrap the jar and associated files into a self-extracting executable program.
I will take the creation of the runnable JAR file first.
The runnable JAR is created and placed in the “dist” folder so that is the first thing to create. The “libs” folder is then created under the “dist” folder to hold the library files. The library files are then copied from the “externalLibs” folder created in an earlier step.
The fx application is then defined giving the application a name, the location and name of the main class to launch the application.
A new folder is created under the “build/classes” folder called “META-INF”.
The JavaFX jar is then called to build a JAR file. The destination file name for the jar file is specified, the application definition is then passed into the jar builder and a reference to the “build/classes”. The details for the manifest file are then defined. The result is a JAR file of the name specified with any external libraries sitting alongside the JAR file in a “libs” directory. This is a runnable JAR file so if this meets your deployment requirements than you can stop here.
The next step is to create an installer that installs the application and creates an executable to launch it. Perhaps it would be good to spend a little time to describe what exactly happens here.
When the deploy stage finishes we are left with an executable file located in our “deploy/bundles” folder under the project. If we run this file what it will do is unpack the files contained within it. It will install to the target directory a small executable file and an associated icon file. Along with these there will also be an uninstall executable file and data file to go with it and a number of dynamic link libraries which are required to enable the executable files to run on the windows platform. There will also be a number of folders created. The number will depend upon the complexity of the application but there will be at least a runtime folder and an app folder.
The runtime folder holds a cut down version of the Java Virtual Machine. When the application is run, it is this JVM that is used to run the application. The advantage of this approach is that the application will always run against a known JVM version. When deploying to the field you do not need to install Java as a pre-requisite or worry about an incompatible version. The version used to build the application is the version used when launched.
The other folder is the app folder. This folder contains the runnable JAR file from the dist section as well as the “libs” folder with the external JAR files.
Finally, the small executable file is registered with the windows start bar, so it appears with the list of applications installed on the computer.
So that is what will happen, how do we do that?
First off, the folder “deploy” is created. Then deploy is called from the JavaFX JAR. For what we want to do, we need to allow offline operation, specify that we want the files created as part of this process to be placed in the “deploy” folder and give the executable a name and state that we want a “dot exe” file.
We then tell the deploy tool where it can find the java installation, give the installer a name and provide vendor name.
Finally, we pass the application details and the application resource details defined earlier into the deploy call and that’s it. After the deploy function has completed we will have in our “deploy/bundled” folder an executable file which when run will install our application and then launch it.
Now this is great, except for this application example it does not work. You see, we have some none java files that our application relies on to work. Without these the application just won’t work. So, we need to do some manual manipulation of our ANT file to pull these last things together.
First off, we are using Log4J2, a library that lets us easily write out information to a log file that can be used for debugging purposes. Now, we are using a properties file to configure Log2J2 and this file needs to sit outside the runnable JAR file. The idea here is; should there be an issue in the field and the log file with standard settings does not provide sufficient information then the configuration file for the log can be altered to increase the amount of log information recorded. It is hoped that this additional log information allows support to locate the issue and resolve it.
So, we need to take our log configuration file which currently sits in the resources folder under the project and move it to a resources folder in our default install path. That is to say, that once the installer has completed, there will be a “resources” folder alongside the “app” and “libs” folders in the installation folder. Within this folder will reside the log2j2.properties file.
Another file we need to copy is also in the “resources” folder under the project. This is the text file which contains the words that the application will read out. Just like the log4j2.properties file we need to copy to its installation location.
The last file we need to copy is the properties file for the application. The application makes use of a text based properties file to set some of the application parameters. The file provides an easy means of configuring the behaviour of the application without the need to alter code. This file needs to end up in the same folder as the runnable JAR file.
So, now we know what we want to do this is how we achieve it.
The build.xml file we get by default makes use of a folder called “projectRefs”. This folder is created during the “setup-staging-area”. So once the directory is created we can copy across the 3 files we need to this folder. Those files in the resource folder will copied into a resources folder under projectRefs.
		<mkdir dir="projectRefs" />
		<copy todir="projectRefs">
			<fileset dir="C:\Users\jmcneil\Documents\workspace\AntTest">
				<include name="app.properties" />
				<include name="resources/**" />
			</fileset>
		</copy>
When we get to the “do-deploy” target we then have to create a resources folder under the “dist” folder
		<mkdir dir="dist" />
		<mkdir dir="dist/libs" />
		<mkdir dir="dist/resources" />
The we can copy the files referenced by “projectRefs” into the “dist” folder of the distribution.
		<copy todir="dist">
			<fileset dir="projectRefs">
				<include name="**" />
			</fileset>
		</copy>
If we then modify the “appRes” object so that it includes the properties file from the “dist” folder and the “resources” folder and its contents from the “dist” folder we have the three files moved ready to be included in the deploy.
If we run the build.xml file now and run our install code, we get a deployment like this:

We have our “app.properties” which allows us to modify certain properties of our application. We have our “thelog.log” file recording information as our code runs. In our resources folder we have the “newwords.txt” file containing the list of words our application uses and also we have the “mylog4j2.properties” file so we can adjust the logging level if we need to.
We have completed the building of our project into a Windows executable file allowing us to deploy our JavaFX application!