Previously I had written a blog called “Wrap Java into an executable with Launch4J”. The title for the article I now realise was perhaps misleading in that it only covered how to download the tool and install. I understand that some readers may actually want an example of how to convert their Java code into an actual executable. This aims to address that short coming.
The previous article was one of a two part series which you can read here:
Java Executables and Wrap Java into an executable with Launch4J
So, you have an application you have written in Java and you want to deploy it as an executable. Well, one way you could do this is by using the tool Launch4J. What this tool will do is take a JAR (Java Archive Resource) file and wrap it up into an executable file. When the exe file runs, it unpacks the JAR file to the hard drive and calls the JVM passing the JAR file and the launch class as parmeters.
Now we understand how it works let’s take a look at step 1, packaging up our JAR file. I use Eclipse as my preferred IDE (Integrated Development Environment) so if you have that you can follow along. If you are using another tool hopefully the instructions are easy enough to translate.
- Ensure you have selected the project containing your application.
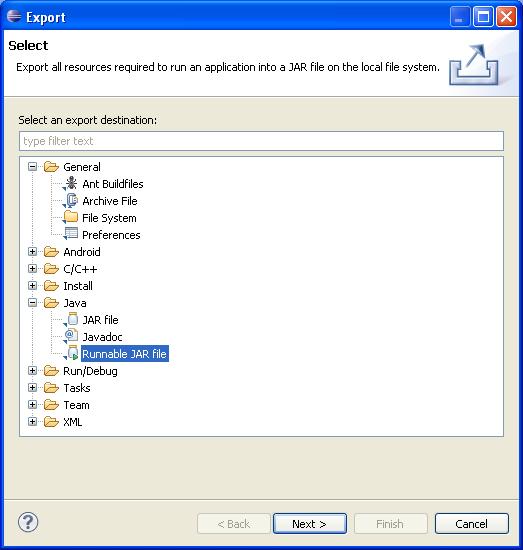
- Then from the menu bar select File-Export which opens the export dialog box
- Expand the Java folder and select “Runnable JAR file” option

- Press the “Next” button
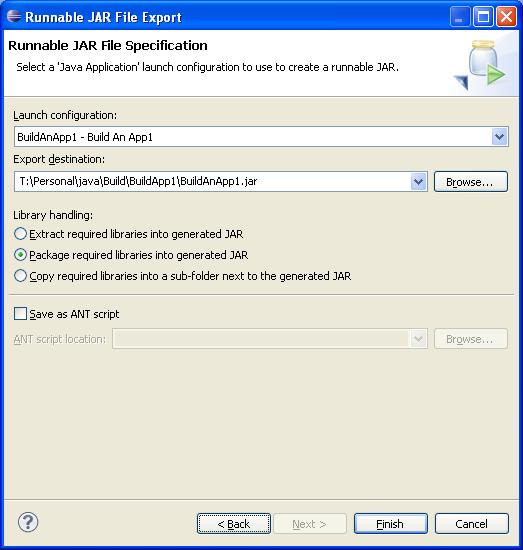
- Select the launch configuration for the project. All this does is allow you to confirm what you want to export. By default the launch configuration for the selected project will be selected
- Select an export destination to create the JAR file including the JAR file name. I generally keep this the same as the project to make it easier to identify things later.
- Select the radio button to “Package required libraries into generated JAR”. I use this option because my projects typically have third party libraries added to them and we need to ensure they are exported into the JAR. So if you are using Log4J for example you will need to do this.
- Press the “Finish” button and the JAR is written to the location specified

The JAR file now needs to be wrapped up into executable code that allows a user to launch like any other application. For this we will use Launch4J. Locate where you installed this software and find the file ‘launch4j.exe.
- Double click the file to launch.
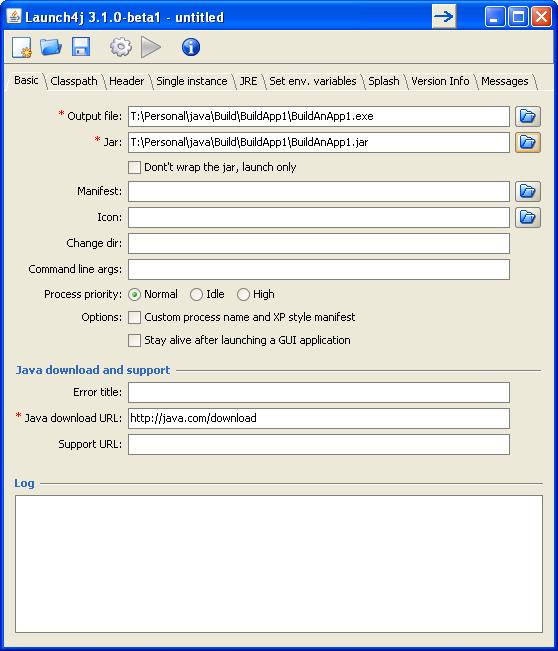
- In the “Output file” field provide a path and file name including extension that you want to call your final executable program. In my case I have gone with ‘T:\Personal\java\Build\BuildApp1\BuildAnApp1.exe’.
- Next in the “Jar” field select the JAR file we created earlier.

- If you application is a concole based application then move to the tab called ‘Header’ and check the radio button ‘Console’ for the ‘Header type’. For SWING examples we will not need to do this as they will be GUI applications and this is the default option.
- Next move to the ‘JRE’ tab. In order to use this tool you must specify the minimum Java Runtime Environment that the application can use. I tend to use ‘1.6.0’ for this but enter a value that matches the build for your application.
- Finally move to the Messages tab and check the ‘Add custom messages’. This is not really required but may be useful if you have trouble getting things working.
- Save the configuration by providing a path and file name. I save the configurations with the JAR and EXE files so I know they all go together.
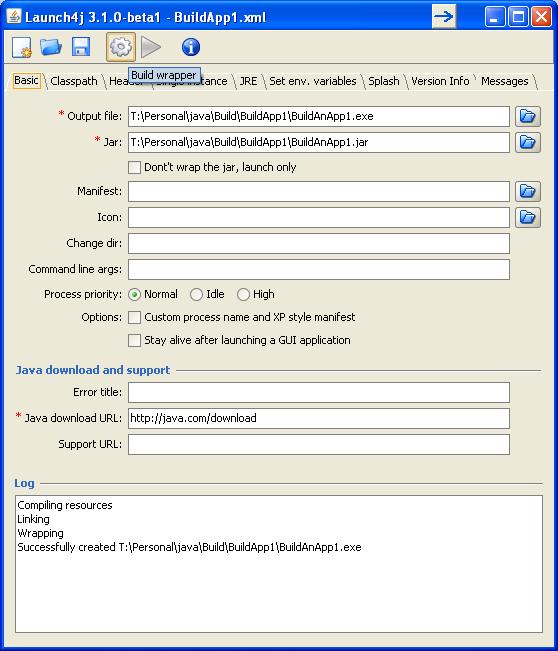
- The last thing to do is build the wrapper which is achieved by pressing the button that looks like a gear. The log box at the bottom is used to provide progress information.

All that remains is to test our new executable file. Locate the file and double click on it, assuming it is a GUI application. You should see displayed on the screen your application.

